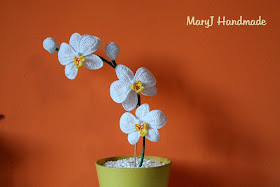
Buongiorno a tutti! Oggi vi propongo un nuovo progetto! Una deliziosa orchidea all'uncinetto :D Io le considero, senza dubbio, tra i fiori più belli e affascinanti... l'unico inconveniente è che sono abbastanza difficili da curare (tutte quelle che ho avuto sono morte stecchite nel giro di poche settimane :( )
Hi! Today I want to show you a new project: A crocheted orchid! I found theese flower beautiful, but I've never been able to keep them alive :( This is the reason why I decided to crochet them :D
Sono molto soddisfatta del risultato finale e spero che piacciano anche a voi! Lo schema è abbastanza semplice, di seguito trovate due video in cui vi spiego come realizzarne una tutta vostra :)
Spero che sia tutto chiaro, lasciate un commento per farmi sapere che cosa ne pensate e per restare aggiornati su tutti i miei lavori, seguite la mia pagina facebook : MaryJ Handmade
Spero che sia tutto chiaro, lasciate un commento per farmi sapere che cosa ne pensate e per restare aggiornati su tutti i miei lavori, seguite la mia pagina facebook : MaryJ Handmade
I'm really satisfied with the end result, and I hope you like it too! The pattern is quite easy to follow. Below you can find 2 videos where I show you how to crochet the orchid :) I hope that everything is clear and understandable. Please, let me know what you think about it, leaving a comment!
If you want to keep up to date, please, follow my blog and like my Facebook page: MaryJ Handmade - English Page
If you want to keep up to date, please, follow my blog and like my Facebook page: MaryJ Handmade - English Page
Tutorial Italiano
Prima parte
Seconda parte
English tutorial
Part 1
Part 2
Written pattern in English:
Sepals:
R.1: Make a magic loop and work: *15ch, 14sc,
1sc into the magic loop* x3
Pull
the tail to close the magic loop
R.2: *Side 1: 1sc, 2hdc, 2dc, 4trc, 2dc, 2hdc,
1sc, 1sc into the loop at the top of
your work.
Side
2: , 1sc, 2hdc, 2dc, 4trc, 2dc, 2hdc, 1sc, 1slip stitch* x3
Sc all around the sepals incorporating the wire.
Petals: (x 2)
R.1: 15ch
Side
1: 1sc, 2hdc, 3dc, 5trc, 1dc, 1hdc, 3sc in 1stitch,
Side
2: 1hdc, 1dc, 5trc, 3dc, 2hdc, 1sc
R.2: Side 1: 1ch, 3sc, 3hdc, *2dc in 1 stitch,
1dc* x2, 2dc in 1 stitch, 2hdc, 1sc, 2sc in 1 stitch,
Side
2: 1sc, 2hdc, *2dc in1 stitch, 1dc* x2, 2dc in 1 stitch, 3hdc, 3sc
Sc all around the petals incorporating the wire
The lip:
R.1: Magic loop with 6sc in it
R.2-3: 1sc in each stitch (6sc)
R.4: 11ch, 10sc, 1slip stitch, fasten off.
R.5: change color, insert the hook in the 4th sc
and work:
(5ch, 4 quadruple crochet tog, 6ch, 1slip
stitch) into the same stitch,
2sc, 1hdc, 1dc, 1trc, 1dc, 3hdc into the same
stitch (side loop), 1dc, 1trc, 1dc, 1hdc, 2sc, (1slip stitch, 5ch, 4 quadruple
crochet tog, 6ch, 1slip stitch) into the same stitch, fasten off
insert the wire in the lip
The buds:
Petal
x 3:
7ch,
R.1: Side 1: 2sc, 2hdc, 1sc, 5dc in 1stitch,
Side
2: 1dc, 2hdc, 2sc, 1sc into the side loop
R.2: Side1: 1sc, 4hdc, 2hdc in 1 stitch, 2dc in
1stitch, 3dc in 1 stitch,
Side
2: 2dc in 1 stitch, 2hdc in 1 stitch, 4hdc, 1sc
Sc all around the petals
incorporating the wire
The leaves: x 2
41ch
R.1: Side 1: 2sc, 3hdc, 5dc, 20trc, 7dc, 2hdc, 3hdc
in 1 stitch,
Side2:
2hdc, 7dc, 20trc, 5dc, 3hdc, 2sc, 3sc in 1 stitch
R.2 Side 1: 2sc, 8hdc, *4dc, 2dc in1 stitch*
x4, 6hdc, 4sc, 3sc in 1 stitch,
Side 2: 4sc, 6hdc, *4dc, 2dc in1 stitch* x4, 8hdc,
2sc
Sc all around the leaves incorporating the wire


